Wednesday, January 29, 2014

Texture Boutique


Perfect for those who haven't got a Big Shot
It's embossing made easy. Texture Boutique is the perfect, portable
tool to create embossed cards, tags, embellishments, and more. Use it
with our Stampin' Up! exclusive Textured Impressions Embossing Folders to transform ordinary cardstock, paper, metallic foil,or vellum into an embossed, textured masterpiece.

This machine embosses only; it does not die cut. Comes with 1 pair of Standard Embossing Pads and 1 Mylar Shim.Texture Boutique Embossing Machine -item#  132657   $49.95 available online here

 http://su-media.s3.amazonaws.com/media/docs/en-AU/texture_boutique/TexturedBoutique_Demo_Flyer_SP.pdf

New Mini Catalogue

http://su-media.s3.amazonaws.com/media/catalogs/SP/20140128_Occasions_AU/20140128_Occasions_en-AU.pdf
Click on pic to view catty
Products Available from the 28th Feb-30 June 2014

Here are a few of the new items available from the catty

 Just Sayin' Clear BundlePeachy Keen Wood BundlePerfect Pennants Clear BundleSimply Celebrate Clear Bundle

Starburst Sayings Wood BundlePetite Petals Wood BundleGeometrical Wood BundleSpiral Flower Originals Die 

Hexagon Hive Thinlits DieBanners Framelits DiesAmpersand Textured Impressions Embossing FolderScallops Textured Impressions Embossing Folder 

Scalloped Tag Topper PunchAngled Tag Topper PunchFringe ScissorsChevron Border Punch

Monday, December 9, 2013

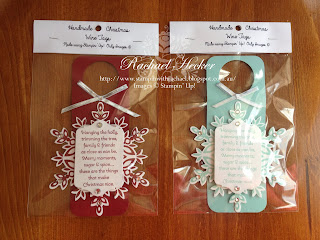
Wine Tags


By special request from Maria, here are the directions for making these wine tags which i made back in October for the wool wheat & wine festival.

 Wine Tags
1)  Cut card stock at 1 3/4" x 5 3/4"(cut an A4 CS in half this way you get 8 tags per sheet cardstock)
2) Score cardstock at 1 3/4"
3) round all 4 corners with corner rounder
4) Punch a 1 3/8" circle in the top section ( this will fit over the wine bottle)
5) Stamp & cut out flurry & sentiment
6) assemble with dimensionals (pop dots)
7) decorate with rhinestones
8) tie a small bow & adhere with glue dot
9) pop it on a bottle of wine and your got yourself a lovely Christmas gift :)

Supply List- All Stampin' Up!
Card stock: Pool party & whisper white
Ink: Pool party
Stamp Sets: Festive Flurry,Merry little Christmas (#131829) & More merry messages( #126402)
Accessories:Silver 1/8" ribbon, rhinestone jewels, dimensionals, glue dots, festive flurry Framelits dies, chalk talk framelit dies, 1 3/8" circle punch & corner rounder

Festive flurry bundle die & stamp set-save 15%  wood #133284 $95.95 clear #133285 $83.95

Festive Flurry Clear-Mount Bundle                  Merry Little Christmas Clear-mount Stamp Set                      

Monday, October 21, 2013

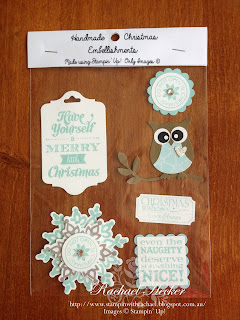
Christmas Market Goodies

I've been a busy little beaver making heaps of goodies for my stall at the Wool, Wheat & Wine festival on the weekend. Here a few pics for you, if you see anything you like to buy just let me no as i have heaps left over.


Wednesday, August 28, 2013

Fishin' Around Water Treat Cup Card

Supplies Used
Stamp set-Fishin' Around single stamp & Banner Greetings hostess set.
Cardstock-Whisper white,crumb cake& pool party
Punches-1 3/4" & 2" circle,
Ink-jet black staz on & crushed curry
Designer Series Paper- Regals collection dsp stack 5 1/2" x half a chevron(lol)
Accessories- Circle treat cups,acetate,crystal effects, adorning accents embossing folder, big shot, champagne glass stampin glitter7/16" natural trim,3/8" delightful daffodil ribbon, stapler,stampin' markers-pool party, coral calypso, crumb cake, coastal cabana, baked brown sugar,crushed curry & barely banana(retired)

 Instructions

Card base-5 3/4" x 8 1/4" scored @ 4 1/8" or 14.8cm x 21cm(half A4 folded in half)
Pool party cardstock-5 1/2" x 3 3/4" emboss with adorning folder that looks like "waves" then punch out hole with 1 3/4" punch for treat cup to sit in.
Acetate 2 3/4" x 2 3/4"

Turn treat cup upside down, pour some glass glitter in then about half to 3/4 fill with water, peel adhesive from the treat cup and place the acetate on top, squeeze to give a good seal, turn over and add some crystal effect to the join so it wont ever leak, leave to dry awhile.
Will look like this, i experimented with regular glitter with this one, gives more of a snow dome look.
Stamp the fish bowl on white cardstock with jet back ink punch out inside of bowl with the 1 3/4" punch. Colour in with the markers. Using a 2" punch or circle die cut out the bowl and stick this to the card front around the hole. Add the ribbon, DSP and the sentiment that you stamped the hand cut out. Line up the card front on the card base, add glue to the back of the fishies & place then back into their bowl, remove top layer. Insert the treat cup into the hole and glue down, then adhere card front to the card, tada! your now finished.


Fishin' Around Gel Card

Cute fishy gel card we made last Thursday night in class. I can't stop playing with it it feel so nice :)
The secret ingredient, hair gel squeezed into a small reclosable lock bag.It has tiny bubbles that look like air bubbles perfect for fishy themed cards.
Instructions
Card measurements-5 3/4" x 8 1/4" scored @ 4 1/8" or 14.8cm x 21cm(half A4 folded in half)
Strip of pool party cardstock-5 3/4" x 1 5/8" embossed with chevron folder then adhere to card front.
Coral Calypso cardstock-4" x 3" embosssed with perfect polka dots
Whisper white cardstock-2 1/2" x 2 3/4" Stamp with jet back ink using stamp-a-ma-jig for perfect placement, punch out inside of bowl with the 1 3/4" circle punch, line this up over the coral calypso cardstock trace with pencil then punch out. Adhere these two layers together then add the ruffle trim with double sided tape to the back.
Grab your reclosable bag, squeeze some hair gel in  but don't over fill it. Then remove any big air bubbles by gently squishing the gel around, seal.
Colour in the fish bowl with markers.Stamp sentiment with coral ink then using one of the dies from the chalk talk framelits set line it up so you get a cut out without using all the die ( or alternatively cut out then stamp on). Adhere this to the back of coral cardstock.
Lay the top layer on front of the card where you want it to go, next add glue to the back of the fish bowl then put back into its original hole. Remove the top layer so you are left with the fish. Turn the top layer over and add double sided tape around the hole, now its time to add the little bag filled with hair gel.Place dimensionals(pop dots) around the out side of gel bag on the cardstock, now adhere to card front, Tada!! your finished.

Supplies Used
Stamp set-Fishin' Around single stamp & Express yourself hostess set.
Cardstock-Whisper white,crumb cake,pool party & coral calypso
Punches-1 3/4" circle, corner rounder
Ink-jet black staz on & coral calypso
Accessories-Chevron & perfect polka dots embossing folders,chalk talk framelit, coastal cabana 3/8" ruffle stretch trim,stampin dimensionals, hair gel, reclosable bag, stampin markers-pool party, coral calypso, crumb cake, coastal cabana, baked brown sugar,crushed curry & barely banana(retired)
The idea for making a gel card comes from Dawn Griffith click here to see her video