Friday, May 25, 2012

Elegant Eggplant Handbag

I think i have a handbag fetish!! I just love making them and can't stop. This cute little bag was a Crafters Anonymous project Tia taught last year. I found it in my stash the other day and just had to show the girls in my stamp class how to make it. Along with making rolled flowers.

Supplies Used
  • Cardstock- Elegant Eggplant, lucky limeade,whisper white
  • Accessories-Vintage wallpaper embossing folder,little leaves sizzlit die,3/8" white taffeta ribbon,vintage eyelets(retired) crop o dile

Shimmer Paint Stamping


Here is another card I CASEd, it's from Becky Roberts, here is her card. I decided to glam mine up by sponging the stamp with crumb cake ink first and then with frost white shimmer paint. Its very pretty and sparkly and you get two different tones depending on how much or little shimmer paint you sponge on the stamp. The newsprint card stock was just very vanilla card stock that i put into my printer and printed out an image i found on the net. I think it was the front page of the new york times from 1908!

Supplies Used
  • Card stock-Crumb cake, lucky limeade,wisteria wonder,elegant eggplant,very vanilla
  • Stamp set- Elements of style
  • Ink-Crumb cake
  • Accessories-Frost white shimmer paint,sponge, 5/8" satin vanilla ribbon,jewels,1" circle punch, scallop trim border punch, 1/16" hole punch,little leaves sizzlit die, beautiful wings embosslit die,glue dots,

French Foliage CASE

I cased this card from Kristine McNickle,it was a card she did for the neutrals challenge at Crafters anonymous last Sunday. She used the new Loving thoughts stamp set but i don't own that yet so i used the teeny tiny sentiments with the hodgepodge hardware instead. Turned out really nice and  I used a technique called rock & roll on the maple leaf to give it two tones, click here for a tutorial.

Supplies Used
  • Card stock-Very Vanilla
  • Stamp set- french foliage, tenny tiny sentiments
  • Ink-Choc chip,soft suede,crumb cake
  • Accessories-mat pack,paper piercer,oval punch,dimensional,spritzer tool,choc chip marker,dmc thread, hodgepodge hardware(retired)

Monday, May 21, 2012

ABMT-Crafters Anonymous

On Sunday the Team from Crafters Anonymous held an Australia's Biggest Morning Tea event online to raise funds for the cancer council, of which they raised $750!!  It was a great day with us making 7 projects for the day, here are my projects
project 1 - cupcake or tea bag box

project 2 -neutrals challenge

project 3 - cake box
project 4 -scrap layout challenge

project 5 -cupcake card

project 6 -recipe challenge

project 7 -choc bar slider

Tuesday, May 15, 2012

Attic Boutique Handbag Tutorial

You will need to cut out 2 with the largest framelits Label die in your choice of cardstock and then score one side on both as i have in the photo.

 You will need a 7 1/2" x 5 1/2" sheet of card stock in same colour as die cut outs. Score the longest side @ 1 1/2" and 6" turn 90 degrees and score @ 2" & 3 1/2". Fold all score marks with a bone folder. Cut the 2 red score lines on each side and fold to form a box. Adhere together  and set aside.
Box assembled

Here are my 2 dies cut and scored. The DSP strip is 1 1/2" x 5" to get the same shape i cut it with the same die lining up the bottom edge of the DSP with the groove that we previously scored along.

Adhere the DSP to dies lining up along the scored line

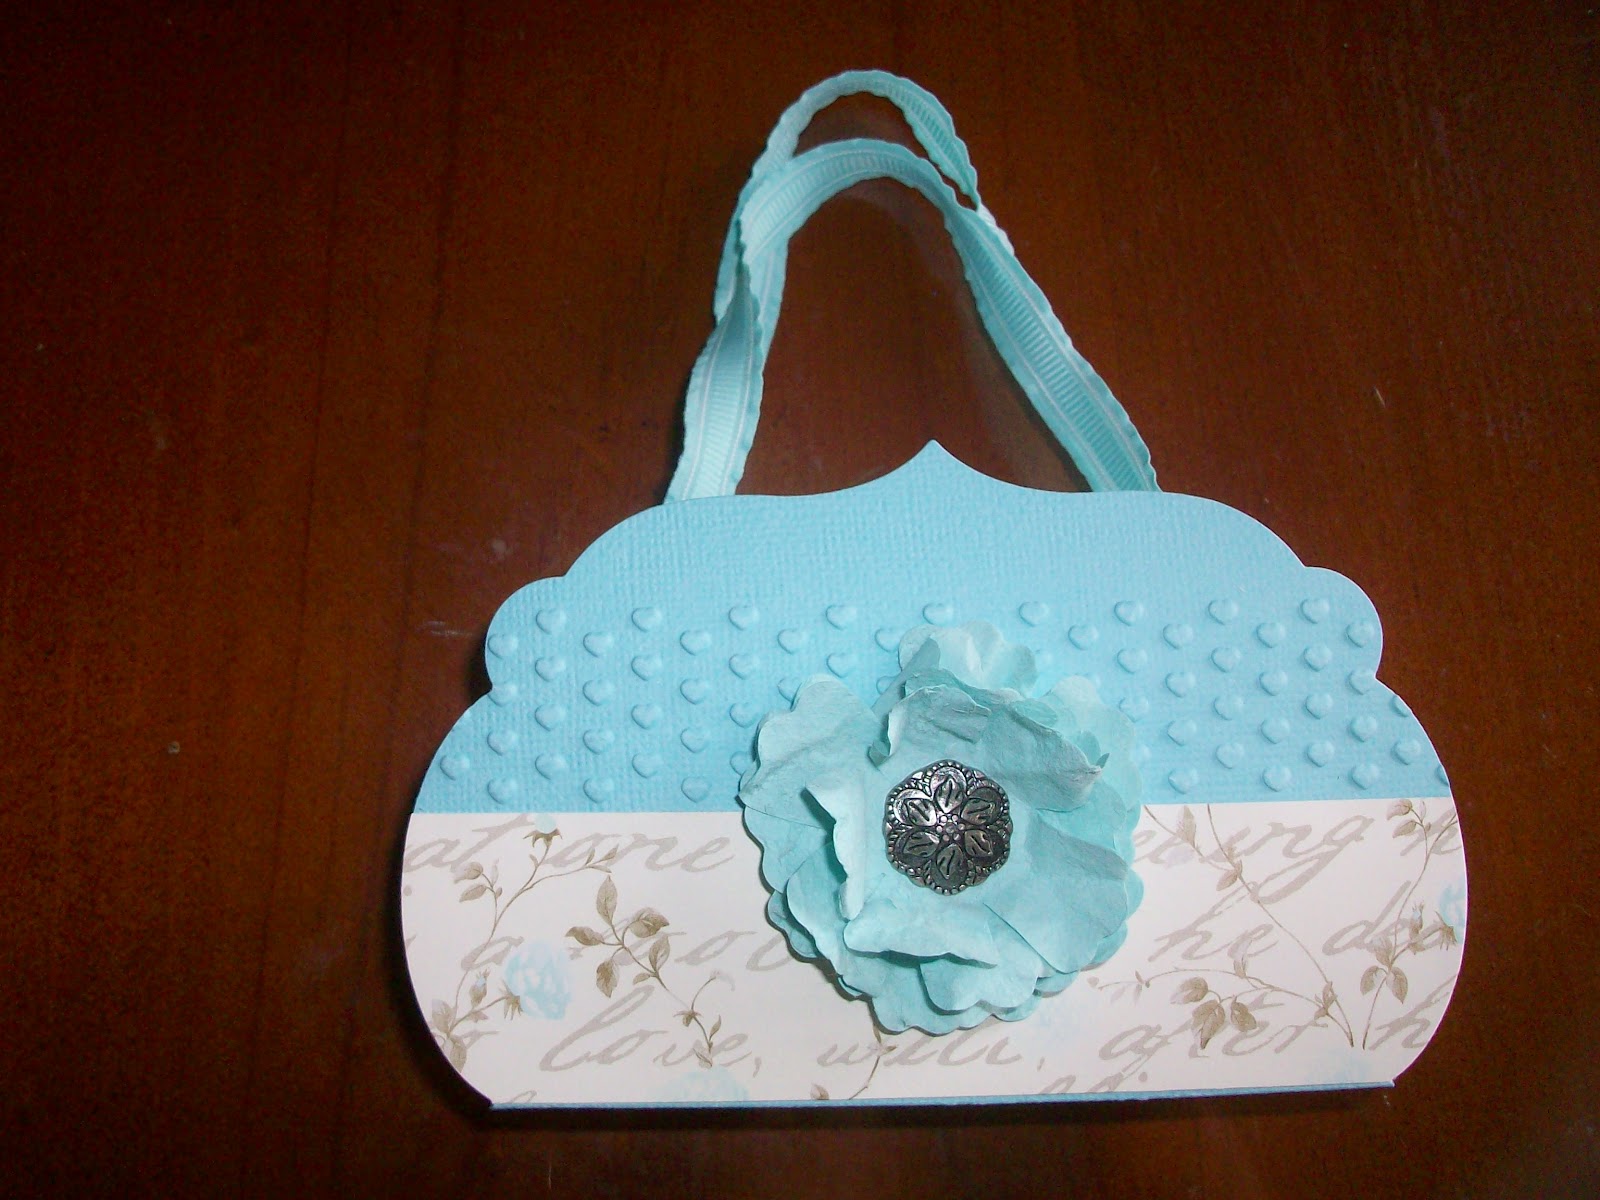
Next emboss with the hearts embossing folder from the Adorning Accents textured embossing folder, lining up the hearts just above the DSP. Fold along the scored line, this will be the base of the bag. Cut 2 lengths of ribbon @ 28cm and add some double sided tape to the ends.

Cut out 2 of the smallest flowers from the fun flowers die and faux suede them. If you don't know what that is click here. You will end up with 4 flowers. scrunch the flowers up in your hand then unravel them gently.

Layer them together then with the paper piercer make a hole in the center and add a vintage brad but don't close the back yet


Choose which die you want for the front and make a hole where you want your flower to go. Push the brad through the hole and close the brad.

Add the ribbon handles as in the photo and double sided tape.

Add the box to the sides, it's easier to line up the base of the box with the scored line then bring up the sides. Then adhere the other end of the die to the base of the box. 

Now your done!!
Hope you enjoy my tutorial, feel free to use it for your classes, workshops, personal use or whatever. I would love to see your finished bag, so add a link to your blog in comments or post a pic on my facebook wall :)

Wednesday, May 9, 2012

Attic Boutique Handbag


I saw a bag similar on Pegasus Ink and just had to make one. I hope to post a tutorial for you soon. This will be one of the projects for Mondays Stamping Class and we will be making the pink one.I'm so loving the new attic boutique designer paper, it's so elegant I hated to cut it up, if you no what i mean.

Supplies Used
  • Big shot-Framelits Labels collection,Adorning accents embossing folder, fun flower die
  • Cardstock-Pink Piroutte
  • DSP-Attic Boutique
  • Accessories-Vintage brad,blushing bride striped ribbon

Spice Cake Handbag

We made this gorgeous handbag on Monday night @ Crafters Anonymous  online class.

Supplies Used
  • Cardstock-Soft suede,pool party
  • DSP-Spice cake
  • Accessories-pool party ruffled ribbon,silver brads,1/2" & 3/4" circle punch, 1 3/4" scallop circle punch,circle #2 die vintage wallpaper embossing folder

Thursday, May 3, 2012

Graduation Cards

Cute owl punch art ready for graduation.Inspired from DOstampin with dawn,see here.
Commissioned card (girl cut out non stampin up) All materials SU