Monday, December 9, 2013
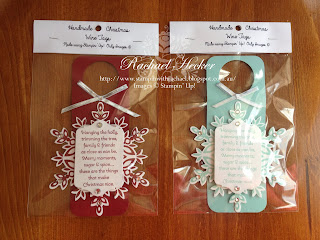
Wine Tags
By special request from Maria, here are the directions for making these wine tags which i made back in October for the wool wheat & wine festival.
Wine Tags
1) Cut card stock at 1 3/4" x 5 3/4"(cut an A4 CS in half this way you get 8 tags per sheet cardstock)
2) Score cardstock at 1 3/4"
3) round all 4 corners with corner rounder
4) Punch a 1 3/8" circle in the top section ( this will fit over the wine bottle)
5) Stamp & cut out flurry & sentiment
6) assemble with dimensionals (pop dots)
7) decorate with rhinestones
8) tie a small bow & adhere with glue dot
9) pop it on a bottle of wine and your got yourself a lovely Christmas gift :)
Supply List- All Stampin' Up!
Card stock: Pool party & whisper white
Ink: Pool party
Stamp Sets: Festive Flurry,Merry little Christmas (#131829) & More merry messages( #126402)
Accessories:Silver 1/8" ribbon, rhinestone jewels, dimensionals, glue dots, festive flurry Framelits dies, chalk talk framelit dies, 1 3/8" circle punch & corner rounder
Festive flurry bundle die & stamp set-save 15% wood #133284 $95.95 clear #133285 $83.95
Monday, October 21, 2013
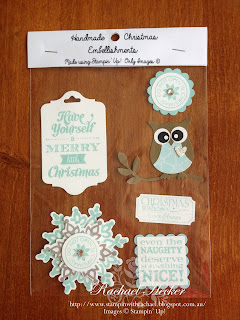
Christmas Market Goodies
I've been a busy little beaver making heaps of goodies for my stall at the Wool, Wheat & Wine festival on the weekend. Here a few pics for you, if you see anything you like to buy just let me no as i have heaps left over.
Wednesday, August 28, 2013
Fishin' Around Water Treat Cup Card
Supplies Used
Stamp set-Fishin' Around single stamp & Banner Greetings hostess set.
Cardstock-Whisper
white,crumb cake& pool party
Punches-1 3/4" & 2" circle,
Ink-jet black staz on & crushed curry
Designer Series Paper- Regals collection dsp stack 5 1/2" x half a chevron(lol)
Accessories- Circle treat cups,acetate,crystal effects, adorning accents embossing folder, big shot, champagne glass stampin glitter7/16" natural trim,3/8" delightful daffodil ribbon, stapler,stampin' markers-pool party, coral calypso, crumb cake, coastal cabana,
baked brown sugar,crushed curry & barely banana(retired)Instructions
Card base-5 3/4" x 8 1/4" scored @ 4 1/8" or 14.8cm x 21cm(half A4 folded in half)
Pool party cardstock-5 1/2" x 3 3/4" emboss with adorning folder that looks like "waves" then punch out hole with 1 3/4" punch for treat cup to sit in.Acetate 2 3/4" x 2 3/4"
Turn treat cup upside down, pour some glass glitter in then about half to 3/4 fill with water, peel adhesive from the treat cup and place the acetate on top, squeeze to give a good seal, turn over and add some crystal effect to the join so it wont ever leak, leave to dry awhile.
Will look like this, i experimented with regular glitter with this one, gives more of a snow dome look. |
Fishin' Around Gel Card
Cute fishy gel card we made last Thursday night in class. I can't stop playing with it it feel so nice :) |
The secret ingredient, hair gel squeezed into a small reclosable lock bag.It has tiny bubbles that look like air bubbles perfect for fishy themed cards. |
Card measurements-5 3/4" x 8 1/4" scored @ 4 1/8" or 14.8cm x 21cm(half A4 folded in half)
Strip of pool party cardstock-5 3/4" x 1 5/8" embossed with chevron folder then adhere to card front.
Coral Calypso cardstock-4" x 3" embosssed with perfect polka dots
Whisper white cardstock-2 1/2" x 2 3/4" Stamp with jet back ink using stamp-a-ma-jig for perfect placement, punch out inside of bowl with the 1 3/4" circle punch, line this up over the coral calypso cardstock trace with pencil then punch out. Adhere these two layers together then add the ruffle trim with double sided tape to the back.
Grab your reclosable bag, squeeze some hair gel in but don't over fill it. Then remove any big air bubbles by gently squishing the gel around, seal.
Colour in the fish bowl with markers.Stamp sentiment with coral ink then using one of the dies from the chalk talk framelits set line it up so you get a cut out without using all the die ( or alternatively cut out then stamp on). Adhere this to the back of coral cardstock.
Lay the top layer on front of the card where you want it to go, next add glue to the back of the fish bowl then put back into its original hole. Remove the top layer so you are left with the fish. Turn the top layer over and add double sided tape around the hole, now its time to add the little bag filled with hair gel.Place dimensionals(pop dots) around the out side of gel bag on the cardstock, now adhere to card front, Tada!! your finished.
Supplies Used
Stamp set-Fishin' Around single stamp & Express yourself hostess set.
Cardstock-Whisper
white,crumb cake,pool party & coral calypso
Punches-1 3/4" circle, corner rounder
Ink-jet black staz on & coral calypso
Accessories-Chevron & perfect polka dots embossing folders,chalk talk framelit, coastal cabana 3/8" ruffle stretch trim,stampin dimensionals, hair gel, reclosable bag, stampin markers-pool party, coral calypso, crumb cake, coastal cabana, baked brown sugar,crushed curry & barely banana(retired)
The idea for making a gel card comes from Dawn Griffith click here to see her videoHappy Father's Day
We made this card in class last Thursday night. I showed the girls how to stamp using an embossing folder. I love the fact that you can use a product in different ways to get different effects. To get this result just ink up the raised side of your embossing folder and push it onto your cardstock, tada! that's all there is to it :)
Card measurements-5 3/4" x 8 1/4" scored @ 4 1/8" or 14.8cm x 21cm(half A4 folded in half)
Whisper white layer-3 3/4" x 5 1/2"
Designer Series Paper layers- Stripes 2 1/4" x 3 3/4", Dots 1" x 3 3/4",last dsp was stamped on then punched out with the curly label punch.
Supplies Used
Stamp set-A Fitting Occasion,Teeny tiny sentiments
Cardstock-Whisper
white, midnight muse
Punches-word window,curly label,1" & 1 1/4" circle.
Ink—midnight muse
Accessories-Honeycomb
embossing folder,stampin dimensionals
Explosion Photo Box
This is the box all folded up & ready to give as a gift. |
This is what it looks like when you open it. |
I made a few of these as they are great to give away to family. |
Explosion Photo Box
Stamp set-Chalk
Talk, My digital studio brush sets-word play, so typefelt, A is for apple & fantabulous you (printed from my computer)
Ink—Real red
Cardstock-Real
red, whisper white, old olive, so saffron, basic gray,
Punches- 1” &
1 3/8” circle, word window,
Dies-Framelits-
labels collection, bitty banners, circles collection
Accessories- hole
punch, adhesive sheets, pop dots, cotton,
Box bottom 12”x12”
or 30cm x 30 cm Real red card stock- scored at 4” & 8” on both sides, and
cut as in pic.
Lid 8 ¼ “x 8 ¼ “ or 21cm x 21cm scored at 15/16” (the mark before the 1” mark) and 2 1/16” (the line after the 2” mark ) on all 4 sides. Cut same as pic.
Bow
You need three 1” strips Designer series Paper cut to: 21cm,
18cm, 13cm & 6cm(can get last 2 from same strip). Join each of the 21cm & 18cm
to form rings with adhesive then pinch in centres, cut flag ends on the 13m strip, layer the two
pinched circles on top of the flagged dsp. Lastly wrap the 6cm strip around the
centre to finish it off.
Mini Card
Stamp set-Chalk
Talk
Cardstock-Whisper
white, real red, old olive,
Dies-Chalk talk framelits
Ink—Real red
Accessories-Honeycomb
embossing folder, bigshot,3/8” old olive taffeta ribbon, glue dot,stampin dimensionals
Monday, August 5, 2013
MDS Tour Melbourne
My Friend & down liner Debra Wayman |
On Saturday I attended the Stampin' Up! My Digital Studio Make a Statement Tour at the convention centre in Melbourne with my good friend Deb. We took our laptops and followed along in the training seminar to create a photobook. The seminar was very informative,I learned heaps and had a great day out. I was surprised that Holly from the My Digital Studio Videos was our instructor, she came all the way from Stampin' Up! home office in Utah, USA.
Here is a link to watch My Digital Studio video's from Stampin' Up! on You Tube-Click Here.
For more info about My Digital Studio visit the website www.mydigitalstudio.net and sign up! its free & only takes a minute.
For a 30 day free trial of MDS Click Here.
Wednesday, July 17, 2013
Holiday Adventures
So here's another My Digital Studio scrapbook layout, this time i made it from scratch :) Yay!! for me, so fun & easy to use, think I'm getting addicted.
Puffing Billy Layout in MDS
Monday, July 8, 2013
My Digital Studio Tour Melbourne
Bring out the digital designer in you and discover
Learn how My Digital Studio can fit in with your life and your style to help you become your own digital designer—creating cards, invitations, photobooks, party décor, recipe books, home décor, calendars and more! Being creative couldn’t be easier!
The cost for this event is only $35, which includes the My Digital Studio Software (worth $24.95), and an afternoon of training at the Melbourne Convention Centre.
Just bring your laptop and follow along in our classes to create your own designer photobook—capturing your own cherished memories! You’ll go home with several complete pages—which you can then print, e-mail or upload to the Internet.
Classes are designed for beginners, to provide you with a basic understanding of My Digital Studio software. Lucky as i have no idea about it all yet!! lol
If you would like to join me for this event on the 3rd August 2013 at the Melbourne convention centre, contact me before the 29th July so i can register you as my guest. Once registered you will be emailed by Stampin' Up! with the MDS Software and instructions for downloading.
I will be traveling with a friend down to Melbourne by train if you would like to join us.
E-mail :rhecker@aapt.net.au
Subscribe to:
Posts (Atom)